NIfTI
Overview
This converter allows you to import NIfTI files into a Supervisely project. It also supports annotations in the NIfTI format (.nii and .nii.gz).
The converter supports both semantic and instance segmentation annotations, as well as import of volumes with no annotations. We will provide an examples of the input structure below.
The converter is backwards compatible with the Export volume project to cloud storage application.
All volumes from the input directory and its subdirectories will be uploaded to a single dataset.
Prepare data for annotations
Important: Spatial Alignment for NIfTI Masks
When uploading 3D masks from NIfTI files, it's crucial to ensure proper spatial alignment with the volume. Without this alignment, annotations may not be correctly positioned relative to the volume data, which can cause issues when using the masks outside of Supervisely's labeling tools.
Why this matters:
Supervisely automatically converts volumes to the RAS coordinate system during upload
If masks are uploaded without spatial alignment information, they won't be transformed accordingly
While Supervisely's labeling tools may display them correctly, the underlying data won't match the volume's coordinate space
This misalignment can cause problems when exporting or using annotations in external tools
Best practices for NIfTI mask upload
Recommended approaches (choose based on your situation):
Option 1: Attach volume header when you already have mask data
Use this when you already have the mask as a NumPy array (e.g., converted from NIfTI or other format) and need to align it with your volume:
Option 2: Convert NIfTI mask to RAS coordinates and use mask's own header
Use this to convert a NIfTI mask to RAS coordinate system. The function returns the mask data and its header in RAS coordinates. This works when mask dimensions match your volume dimensions:
Following these practices ensures your annotations maintain correct spatial alignment across all tools and workflows.
Format description
Supported image formats: .nii, .nii.gz.
With annotations: Yes (semantic and instance segmentation).
Supported annotation format: .nii, .nii.gz.
Data structure: Information is provided below.
Input files structure
Example 1: grouped by volume name
The NIfTI file should be structured as follows:
If the volume has annotations, they should be in the corresponding directory with the same name as the volume (e.g. CTChest, without extension).
Annotation files should be named according to the following pattern:
Name of the class (e.g.
lung,tumor) +.niior.nii.gz.The class name should be unique for the current volume (e.g.
tumor.nii.gz,lung.nii.gz).Annotation files can contain multiple objects of the same class (each object should be represented by a different value in the mask).
Example 2: grouped by plane
The NIfTI file should be structured as follows:
For semantic segmentation:
The filename must contain one of the required plane identifiers:
axl,cor, orsag, anywhere in the name.The file representing the anatomical volume should have
anatomicalstring in it's filename representing the volume type.The annotation file for all classes should also include the prefix, volume type label (
inference,mask,annetc.), ending with.niior.nii.gz.
For instance segmentation:
The anatomical volume file must include the plane identifier (
axl,cor, orsag),anatomictype label and end with.niior.nii.gz.Each annotation file must also include the plane identifier and type label (
inference,mask,annetc.), ending with.niior.nii.gz.Multiple annotation files per plane are supported, each representing a separate class (and may contain multiple objects).
Note: Filenames can include other descriptive parts such as patient or case UIDs, body parts, arbituary strings or other identifiers, as long as the required plane and type identifiers are present and the file extension is .nii or .nii.gz.
The plane identifier must be one of: cor, sag, or axl. The converter uses these prefixes to group volumes and their annotation files, requiring exactly three volumes - one for each prefix per folder.
Structure example for semantic segmentation:
Structure example for instance segmentation:
Example 3: grouped by plane w/ multiple items
If you need to import multiple items at once, place each item in a separate folder. The converter supports any folder structure. Folders may be at different levels, and files will be matched by directory (annotation files must be in the same folder as their corresponding volume). All files will be imported into the same dataset.
Structure example for multiple items directory:
Example 4: Upload with scores and comments metadata
Starting from SDK version v6.73.394 and instance version v6.13.8, the converter supports uploading NIfTI files with additional metadata – scores. To upload this metadata, you need to create corresponding CSV files for each volume-annotation pair. Make sure that the CSV file name contains score (instead of anatomic or inference) and has the same prefix as the NIfTI file.
Structure example for uploading with scores and comments:
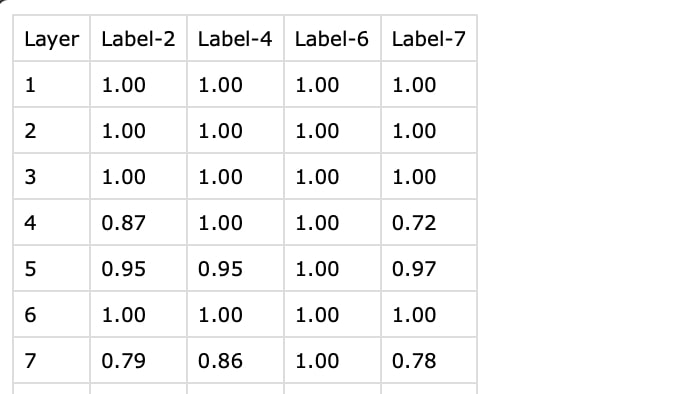
Where the CSV files should be structured as follows:

where:
Layer: The frame number in the NIfTI file (starting from 1).
Label-2, Label-4, ...: Corresponding labels for the NIfTI file, which contains the
Label-prefix with the corresponding pixel value in the NIfTI file.
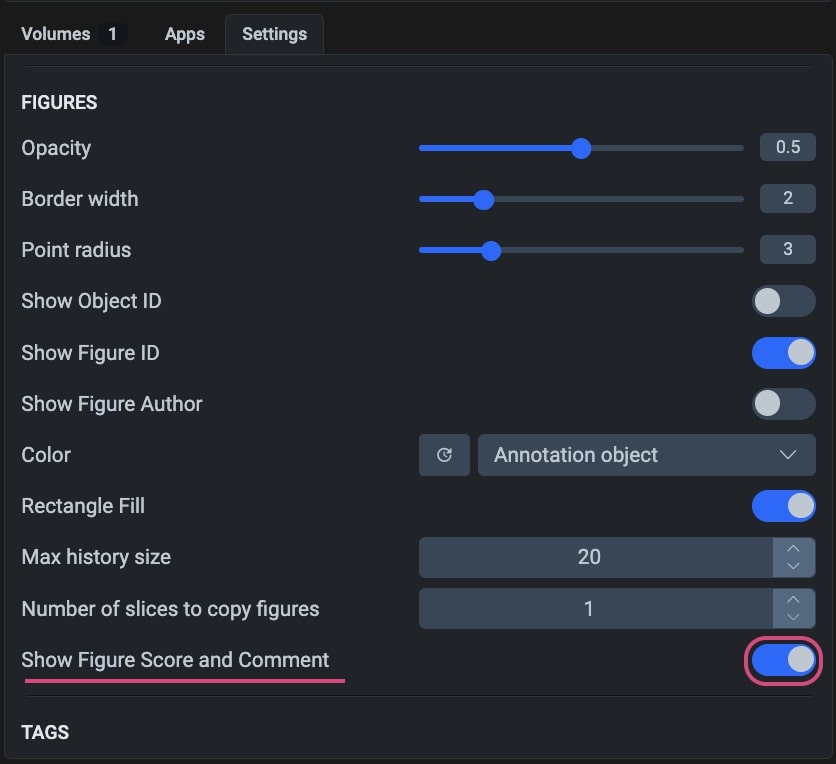
To view the scores and comments in the Labeling Toolbox, you need to enable the "Show Figure Score and Comment" option in the toolbox settings.

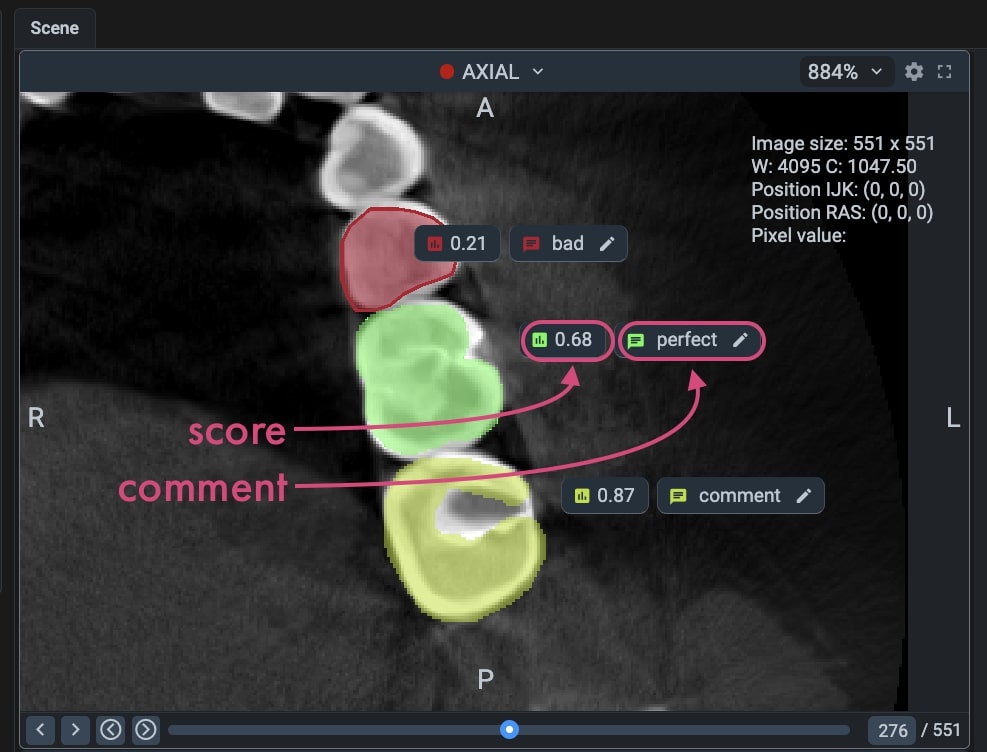
After enabling this option and uploading the NIfTI files with scores, you will see the scores and comments in the Labeling Toolbox.

Impotant: You can import and export scores, but you cannot edit them in the Labeling Toolbox. Comments can be edited in the Labeling Toolbox, but they will not be saved back to the CSV files.
Class color map file (optional)
The converter will look for an optional TXT file in the input directory. If present, it will be used to create the classes with names and colors corresponding to the pixel values in the NIfTI files.
The TXT file should be structured as follows:
where:
1, 2, ... are the pixel values in the NIfTI files
Femur, Femoral cartilage, ... are the names of the classes
255, 0, 0, ... are the RGB colors of the classes
Upload annotations separately
Plane-structured converter supports uploading annotations separately (uploading annotations to existing volumes). This functionality supports both dataset-scope and project-wide annotation imports.
By default, annotations are matched with their corresponding volumes based on filenames. However, a custom mapping can be provided via a .json file to explicitly define the mapping.
Input structure example for dataset scope:
Input structure example for project-wide import:
JSON mapping
Mapping structure should be as follows:
Where key should be annotation filename, and volume ID as value
If you want to import annotations for the entire project via a JSON mapping:
Pack annotations inside folders with corresponding dataset name as in an example above
Specify the dataset name in a
.jsonfile in a path-like manner (dataset_name/annotation_filename)
Example JSON structure with dataset specification:
Useful links
Last updated